Entering individual catalog items (Auction Tracker)
When entering your items into Auction Tracker we suggest setting your baseline standards for all entries, this will keep all the printables that come from Auction tracker looking uniform, things like catalogs, bid sheets and displays. We suggest creating a standards cheat sheet for all items including things like:
- How to enter the Item Name- All Caps, All first Letters Caps or standard type
- Will numbers be used? (2 night stay), the word (Two Night Stay) or both ( Two (2) Night Stay)
- Date Format? 11/11/11, Nov. 11, 2011 or November 11, 2011.
- How will you show your expirations? Expires on, Valid Through or Good Thru.
- Descriptions? Wordy, or colorful.
These are just a few, it seems like a small thing but when everyone is on the same page the final look is much more cohesive.
**Also remember that Catalog numbers can not contain a letter if they are to transfer to the MaxGiving site.
To get to the Add Item pop up, click on the Book Button for “Auction Items” (upper left of your screen)
or click on down arrow next to image of items; Catalog Items, select Add/Edit/Delete Items

The Catalog Items dialog box now appears. On the upper left of this box, click on the Green Plus Sign and select Individual Item. *** Click here to learn how to make packages.

The New Catalog Item box will pop up: (Using your Tab key is an easy way to navigate in this system)
This pop up has 7 tabs and in adding a new item we will be using 6 of them. *** You can choose to skip anyone of the tabs or boxes and come back to them later however you must add at a minimum an Item Name.
ITEM DETAIL TAB: This is the basic details of the Procured Item Enter the Item Name – this is the “true” definition of the item. This is the most important tab to complete.
This tab is separated into 6 sections:
- Individual Item
- Item Name - This is the true definition of the item.
- Catalog name – this is the “fancy” definition of the item, if you are not wanting a different name than the Item Name – leave Catalog Name empty, it will automatically pull out the Item name for bid sheets and Catalog export.
- Fair Market Value - The true Value of the item.

- Procurement # - You might see the Procurement # has been automatically assigned by the system, if not you can add one now. *** We suggest you make note of this number on the item as this will be how all items are tracked until we assign Catalog #s closer to the event.
- Date Entered - This box will auto populate with today's date, by clicking the down arrow you can choose a date from the calendar if you would prefer.

- Event Bio
- Catalog # - this will be the number the Item/Package will be sold by later ***At this time we suggest leaving this blank, it is easier to assign them all at once closer to the event date. No Letter can be used in Catalog #s if these items are to transfer to the MaxGiving site.
- Auction Type - This is what Auction you want this to appear in, such as Silent, Live or Supper Silent. Click on the blue down arrow to choose from the list. If you do not see your choice, select add option and add your choice to the picklist, it will be there the next time. **To edit the name or spelling of an existing Auction Type go to Utilities > Configure Application > Auction Event Picklists > Item Picklists > Auction Types
- Category – These should be true category descriptions of items, such as Memorabilia, Travel, Restaurants. After the event we can use these to pull reports to show us what is successful at our event. Click on the blue down arrow to choose from the list. If you do not see your choice, select add option and add your choice to the picklist, it will be there the next time. **To edit the name or spelling of an existing Category go to Utilities > Configure Application > Auction Event Picklists > Item Picklists > Item Categories.
- Worded Value - This is used if an item is truly a priceless item, there are IRS guidelines to follow when choosing to use the word Priceless. Leave blank if not priceless.

- Bid Information
***These may have automatically populated when you entered the Fair Market Value if when you set up the event you chose to use the auto populate feature. ** If you did not set this up at the start you can do it now, click here to see how. You can adjust these amounts if you need.
- Exclude Bid Info - If you do not want any bid info to show on any printables click this box. **This is used by some organizations when dealing with their live items.
- Starting Bid - This is the amount that will be needed to start the bidding.
- Bid Raise - This is how much each bid will raise by.
- Guaranteed Bid - This is the Buy it Now price. Even if you do not plan on offering a Buy It Now price, fill this out, you can choose to not use it at a later time.

- Tax Rates
- Select the Box for the tax rate that fits this item if this item is being taxed. ***Check with your accountant on your state laws.

- This Item Is/Requires ***Reports can be printed listing all of our certificates, for verification on the day of our event.
- Select the box for Tangible if this item is tangible
- Select the box for Certificate if certificate. Please note – gift cards, sports tickets would be considered certificates if you don't put them out on the tables or in a basket and put them in a certificate box.
- If you select Certificate Item the Create Certificate box will become available. This will allow you to use the Certificate Writer feature to gather the Data for your mail merge.
- Tax Receipts Exempt - If you Click this box the sales tax will be excluded on guest receipt. This is for organizations that selected sales tax apply to all items when configuring their event.

When you have filled in this tab Click on Apply and then click on the Warehousing Tab.
WAREHOUSING TAB: You can use this tab to keep track of the item, if it has been received, where it is or if it needs to be picked up. This is an optional tab but if you use this tab to track locations, you can print a report later to use as an inventory sheet before bringing items to the event.
- Item Delivery Schedule box - you can choose how the item will arrive, Drop off, pick up or in the mail. You can also enter the dates of drop off/pick up. *** If you need to keep track of a pick up address you can use the yellow warehousing note on the top bar of the Catalog Item Dialog box.
- Item Received box - In this box you can mark the item as received, the date it was received and the location it is being stored.

When you have filled in this tab Click on Apply and then click on the Donors Tab.
DONORS TAB: This is where you will acknowledge who has donated this item.
- In this tab you will click in the constituent list on the left and start typing the last name of the donor, this will bring you to the alphabetical area in your list. If the name is there, double click on it or click the select button to add it to the box on the right. When you click Select for the name (or double click to select name) the Donor Catalog Text Dialog Box opens. This is the space where we write the name of the donor if different from what we have as a constituent. For example, anonymous, The “Name” Family. *** You can add as many donors to an item as needed. However, only the first donor will receive the Statement of Donation and will be instructed to provide a copy with donation amounts to additional donors.
- If the name is not there, click on Add Individual or Add Business, in the center of this screen.

When you have added all Donors click on the Solicitors Tab.
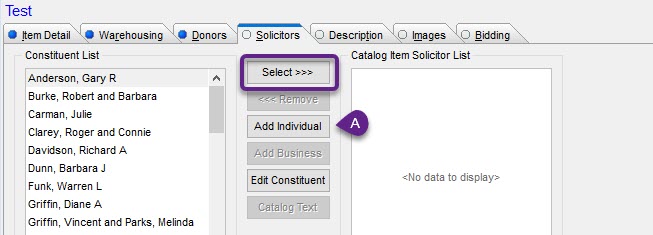
SOLICITORS TAB: This tab keeps track of who from your organization is responsible for acquiring this item, reports can later be printed to thank them or have them find same items next year.
- In this tab you will click in the constituent list on the left and start typing the last name of the solicitor, this will bring you to the alphabetical area in your list. If the name is there, double click on it or click the select button to add it to the box on the right. When you click Select for the name (or double click to select name) the Donor Catalog Text Dialog Box opens. This is the space where we write the name of the donor if different from what we have as a constituent. For example, anonymous, The “Name” Family. *** You can add as many solicitors to an item as needed.
- If the name is not there, click on Add Individual in the center of this screen.
When you have added all Solicitors click on the Description Tab.
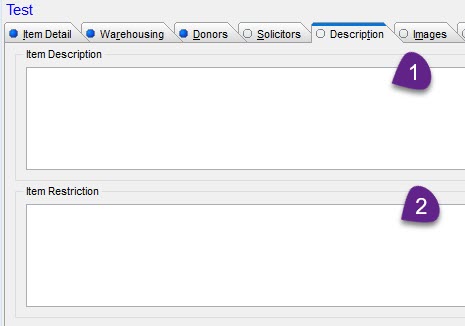
DESCRIPTION TAB: This tab is where you will let people know about the item. It is the 2nd most important tab to complete.
- Item Description - Enter the description. This is a plain text field, you will not be able to bold, italicize or underline. Be as descriptive as possible. It is a good idea to include locations for places as well as dates of events, colors, sizes, makers and really as much detail as possible.
- Item Restriction - Enter any restrictions here. Such as Expiration dates, black out dates apply, no tips included, alcoholic beverages not included. Etc.
When you have filled in this tab Click on Apply and then click on the Images Tab.
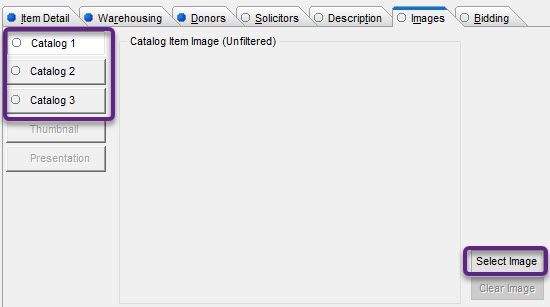
IMAGES TAB: You can choose to add photos in Auction Tracker. *** If you are going to be using an MaxGiving.bid auction site you will not want to put your photos in Auction Tracker, you will want to save them in a folder on your computer or use the easy Add images tab on your MaxGiving site once items have transferred over. If saving your images to a folder, make sure you have your photos named to correspond with the catalog number for the item and if you have more then one photo per item simply add a,b,c after the catalog number.
If you do choose to add photos to Auction Tracker
- Click the button to the left for each photo being added then click the select image button on the right. The File section pop up will appear, find the photo you would like to use and select it. You can do this 3 times for each item.
When you have filled in this tab Click on Apply, then click Cancel and you are done.
DUPLICATING ITEMS - Use this feature if you received multiple of the same item and would like to sell them individually or use them separately in a package later but do not want to have to enter the same info multiple times.
- Once you have entered all the info for one individual item completely, filling out all tabs that are applicable and you have saved by clicking Apply, you will select “Duplicate Item” on bottom.
- Then enter additional copies needed in the pop up . Adding 1 copy will make a total of 2 and click OK. *** Make sure to put all procurement numbers on the item they will all have different numbers now.

Copying Items from a past event:
If you have items you would like to copy from a previous year you can do this but you must be in the event you want to copy from.
1. Click on the down arrow next to ‘Auction Items,’
2.Select ‘Catalog Items,’
3. Then select “Move/Copy Catalog Items’
4. Then select ‘Copy Item(s) To Another Auction’

5. In the ‘Copy Item(s) To Another Auction’ pop up you will select the items you want to copy over
6. Once you have selected the items click on the down arrow next to the ‘Copy Catalog Item(s) To:’ box and select the event you would like to copy the items to from the drop-down list, once the event is selected.
7. then click on ‘Begin Copy. A warning will pop up click on yes then exit out of the report.


- Click yes in the next pop up box This will copy your items from a past event to this one...however I still suggest going into the item and double checking the info is all still correct. Expiration dates and restrictions will most likely have changed.

***If you are using Auction Tracker in conduction with a MaxGiving.bid online site, click here for instructions on how to transfer your items to the site.